
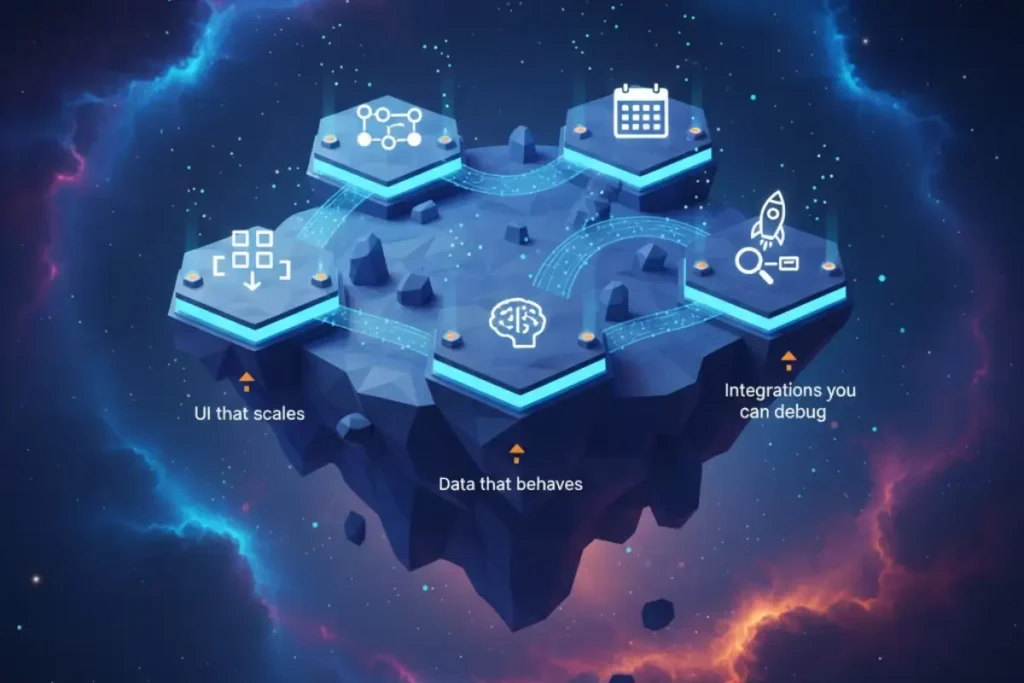
In 2026, the winning FlutterFlow learners aren’t the ones who watched the most videos — they’re the ones who can ship: a clean UI, real data, authentication, reliable actions, and a release-ready build. This roadmap is built around the skills that keep paying off even as features evolve:
- UI that scales (responsive layouts, reusable components)
- Data that behaves (collections/tables, queries, filtering)
- State you can reason about (local/app state, parameters, persistence)
- Integrations you can debug (APIs, custom actions, auth providers)
- Release discipline (testing, performance, deployment checklists)
If your goal is to learn flutterflow for real-world projects, this is the path that keeps you out of tutorial limbo.
The learning model that works: Build → break → fix → ship
The best progress comes from repeating a simple loop:
- Build a small feature
- Break it on purpose (change inputs, clear state, simulate empty data)
- Fix it using the docs and debugging tools
- Ship it (even if it’s just to internal testers)
This is the best way to learn flutterflow because you train the skill that matters most: turning vague requirements into working screens and reliable logic.

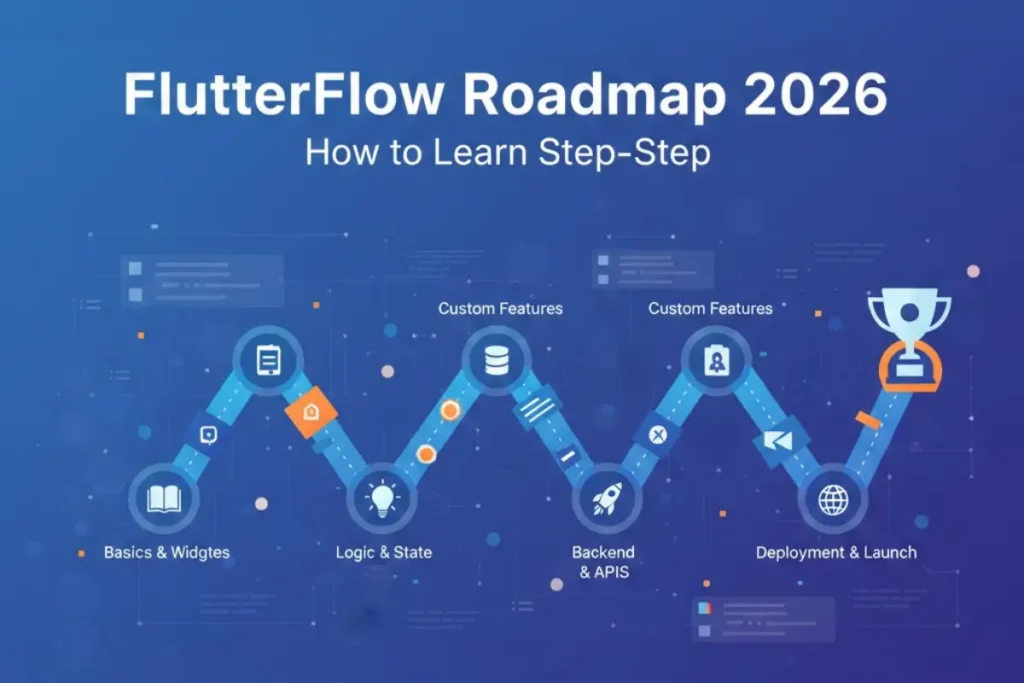
Step-by-step learning roadmap (from zero to shipping)
Below is a practical sequence you can follow. Think in phases — each phase adds one “layer” of real app development.
Phase 1 — UI foundations (Days 1–5)
Goal: Build screens that look good and behave predictably.
Focus on:
- Layout basics (columns/rows/stack, padding, constraints)
- Reusable components (buttons, cards, list items)
- Navigation and parameters (pass IDs, pass objects)
- Responsive design (breakpoints, flexible spacing)
- Basic animations (only where they help UX)
Output to ship: a 3–5 screen UI prototype with navigation and empty states.
Common mistake: copying a design pixel-for-pixel but ignoring reusable components. You’ll move faster when you build a component library early.
Phase 2 — Data + Auth fundamentals (Days 6–12)
Goal: Move from “pretty screens” to “real app.”
Focus on:
- Data modeling (what’s a record? what’s the unique ID?)
- Queries (filtering, sorting, pagination patterns)
- Authentication (email/password, social providers if needed)
- Roles & permissions (basic user vs admin patterns)
- Empty/loading/error states for every query
Output to ship: a working sign-in flow + a list/detail screen backed by real data.
Common mistake: trying to build advanced features before data is stable. If your data model is unclear, everything else becomes fragile.
Phase 3 — State + logic (Days 13–18)
Goal: Make your app feel “smart” and consistent.
Focus on:
- Local state vs app state (what must persist?)
- Form validation (don’t trust user input)
- Conditional UI (role-based visibility, feature flags)
- Action sequences (create → update → refresh → navigate)
- Error handling (timeouts, nulls, permission failures)
Output to ship: a create/edit flow that updates correctly every time.
Common mistake: state sprawl. If you store everything globally, debugging becomes painful. Keep state as local as possible.
Phase 4 — APIs, integrations, and custom actions (Days 19–24)
Goal: Connect your app to the real world.
Focus on:
- REST basics (headers, auth tokens, pagination)
- JSON parsing (what fields are optional?)
- Caching patterns (when to reuse data)
- Custom actions (only when necessary; keep them small)
- Logging and debug discipline (what did the API actually return?)
Output to ship: one external integration (payments, maps, messaging, or any API) that works reliably.
Common mistake: adding too many integrations at once. Pick one, do it properly, document it, then expand.
Phase 5 — Release readiness (Days 25–30)
Goal: Turn your project into something you can share confidently.
Focus on:
- Performance basics (image sizes, list rendering, query efficiency)
- Accessibility and UX polish (tap targets, contrast, empty states)
- Crash-proofing (null safety, defensive logic)
- Build & release steps (Android/iOS/web depending on your target)
- Analytics and feedback loops (track key events, fix what users hit first)
Output to ship: a v1 release to testers with a short changelog and known issues list.
Common mistake: treating “build succeeded” as “app is ready.” Real readiness means predictable behavior across edge cases.

Mini example workflow: Build a “Habit Tracker” MVP (conceptual)
Here’s a lightweight workflow you can follow without heavy code — just clean structure.
1) Define the MVP scope (30 minutes)
- Users can create a habit (name, schedule, reminder)
- Users can mark daily completion
- Users can view weekly progress
2) Model the data (45 minutes)
- Habits: id, userId, title, createdAt, active
- Completions: id, habitId, date, completed (true/false)
Keep it simple: avoid over-modeling early.
3) Build the screens (2–3 hours)
- Auth screen
- Habit list (with empty state)
- Habit create/edit
- Habit detail (weekly progress list/grid)
4) Connect actions (1–2 hours)
- Create habit → navigate back → refresh list
- Toggle completion → update record → refresh UI
- Delete habit → confirm → remove → show toast
5) Add guardrails (1 hour)
- Validation: habit name required
- Error UI: show “Try again” for failed actions
- Loading states: skeletons or spinners that don’t block the whole screen
6) Ship a test build (30 minutes)
- Share with 2–3 people
- Ask: “Where did you get stuck?” and “What felt slow/confusing?”
This kind of mini-project is how you learn flutterflow from scratch and end up with real confidence — not just screenshots.
Beginner plan: 7 days (to get moving fast)
This is the fastest plan that still builds correct habits.
Day 1: UI basics + navigation
Build 3 screens, add navigation, pass one parameter.
Day 2: Components + responsive layout
Create 2 reusable components and apply them across screens.
Day 3: Data model + first query
Create collections/tables, show a list screen with loading/empty states.
Day 4: Auth setup
Implement sign-up/sign-in and route users correctly.
Day 5: Create/edit flow
Add forms, validation, and a reliable save action.
Day 6: App state + conditional UI
Add app state for user preferences, show/hide UI based on conditions.
Day 7: Ship a tiny MVP
Polish edge cases and share a build with a friend for feedback.
If you’re aiming to learn flutterflow for beginners, this week should end with a working app — not just a design.
Focused plan: 30 days (to become job-ready faster)
This plan assumes 60–90 minutes per day.
Week 1: Foundations + UI discipline
- Build a component library (buttons, cards, list rows)
- Create a responsive layout strategy
- Practice parameter passing and routing
Week 2: Data + auth + CRUD mastery
- Data modeling exercises (3 different app ideas)
- CRUD flows with validation and error states
- Roles: user vs admin (simple rule-based UI)
Week 3: Integrations + real-world behaviors
- One API integration end-to-end
- File upload (if your app needs it)
- Offline-ish UX: caching and graceful empty states
Week 4: Release readiness + portfolio polish
- Performance cleanup
- UX audit (empty states, accessibility basics)
- Build and share a v1
- Write a short case study: problem → approach → result → lessons
This is how to learn flutterflow in a way that translates to paid work.
Tutorials vs Course vs Bootcamp (pros/cons)
If you’re comparing learning paths, use this decision lens. Most people don’t need “more content” — they need structure and feedback.
| Path | Best for | Pros | Cons |
|---|---|---|---|
| flutterflow tutorial | Quick fixes, single features | Fast, targeted, free/cheap | Easy to get stuck in “copy mode” |
| flutterflow course | A structured path with projects | Clear sequence, fewer gaps | Quality varies; can still be passive |
| flutterflow bootcamp | Fast transformation with accountability | Feedback, deadlines, community | Higher cost; intense pace |
| flutterflow training | Teams or learners who want guided practice | Practical, skill-based learning | Needs consistent schedule |
If you’re bouncing between random videos, consider a structured flutterflow course or flutterflow bootcamp when you’re ready to commit. There are many flutterflow courses, but the best ones force you to build, debug, and ship — not just watch.
Common mistakes (and how to avoid them)
Mistake 1: Building UI before defining data
Fix: write a simple schema first. Your UI will become cleaner immediately.
Mistake 2: Overusing global state
Fix: keep state local unless multiple screens truly need it.
Mistake 3: No empty/loading/error states
Fix: every query needs all three. Treat it as non-negotiable.
Mistake 4: “It works on my device”
Fix: test small screens, large screens, slow network, empty data, and logged-out states.
Mistake 5: Chasing advanced features too early
Fix: ship a small MVP first. Complexity is easier when you have a stable base.
Practical checklist (save this for every project)
UI & UX
- Reusable components created (buttons/cards/list rows)
- Responsive behavior tested at multiple widths
- Tap targets and spacing feel consistent
- Clear empty states (not just blank screens)
Data & state
- Data model documented (entities + relations)
- Queries have loading/empty/error handling
- State is local by default; global only when needed
Actions & reliability
- Forms validated (required fields, formats)
- Action sequences handle failures gracefully
- Logs added for API responses and critical actions
Release readiness
- Performance reviewed (images, lists, queries)
- Basic analytics events chosen (sign-up, key action, purchase)
- Test build shared + feedback collected
Choosing learning resources (without wasting time)
If you’re trying to learn flutterflow efficiently, pick resources based on the phase you’re in:
- Foundations: official FlutterFlow Documentation sections like “Get Started,” UI building, and navigation.
- Backend & auth: FlutterFlow docs for backend setup + the official Firebase documentation for authentication concepts.
- Integrations: API reference + examples, plus one real project where you integrate and handle errors.
- Shipping: FlutterFlow docs for build/release, and platform guidelines for app store readiness.
A flutterflow complete course can help when you want one sequence that ties all phases together, but you still need projects and repetition.
A realistic timeline (so you don’t feel behind)
- 7 days: you can build a small MVP and understand the basics.
- 30 days: you can ship a portfolio-grade app with one integration.
- 60–90 days: you can build confidently, debug faster, and scope projects realistically.
The goal isn’t to “finish content.” The goal is to build apps with fewer surprises.
FAQ
1) What should I build first as a beginner?
A small CRUD app with authentication (notes, tasks, habits). It teaches UI, data, and state without complex integrations.
2) Do I need to learn Flutter/Dart before FlutterFlow?
Not at first. You can start no-code, then learn Dart basics later for custom actions and deeper control.
3) How many hours a week do I need?
Even 5–7 hours/week works if you build consistently. Consistency beats marathon sessions.
4) When should I start using APIs?
After you can build a stable CRUD app with auth. APIs are easier when you already understand data flow and error states.
5) How do I avoid tutorial dependency?
After watching one lesson, rebuild the same feature from memory. Then change one requirement (like sorting or filtering) and fix it.
6) Is a “full program” worth it?
If you want structure, projects, and fewer gaps, a flutterflow full course can be a good next step — especially when you’re ready to ship a portfolio app.